
Here are a few techniques we learned in last week’s class — a left- and right-leaning braid, and a two-color cast on.
This is a picture heavy post. If you’re interested in any of these techniques they’re behind the cut.
These techniques are really not that hard. They’re decorative and look like they take a long time to do, but they really don’t. If you’re feeling cautious, go grab 2 colors of wool yarn from your stash and give it a go.
Two-Color Cast-on
If you know how to do a long-tail cast-on this will be a breeze.
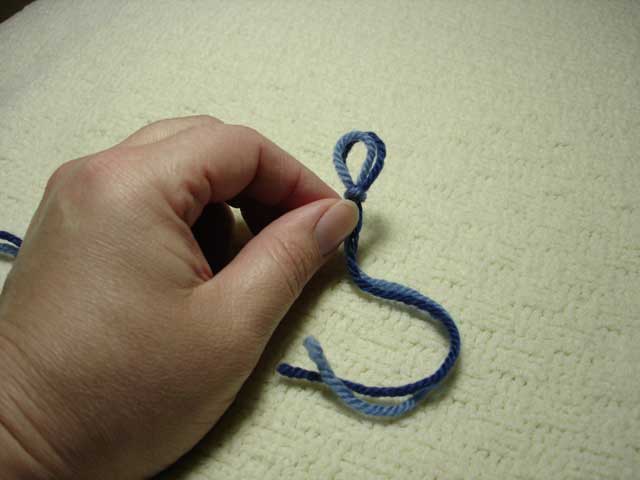
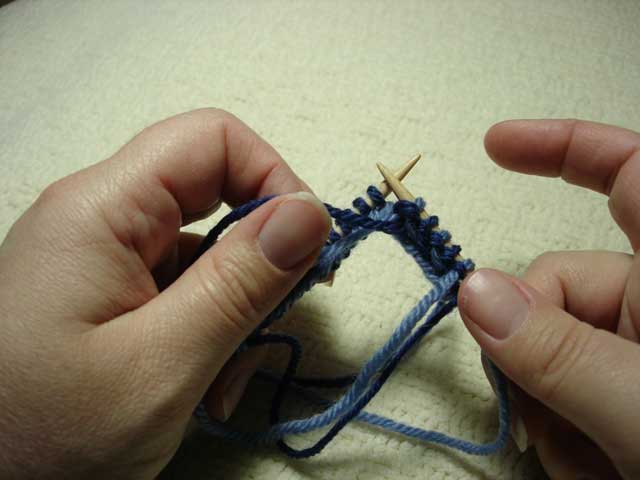
Step 1 – Tie a slip knot with both yarns together. Important – do not leave a long tail here. It’s unnecessary and will just leave 2 long tails to weave in later.
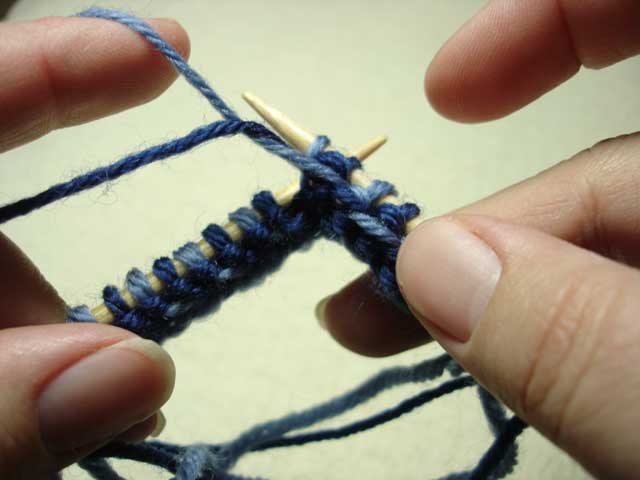
Put both loops on your needle, making sure that the color you want to be the bumps below the cast is the color on the right.
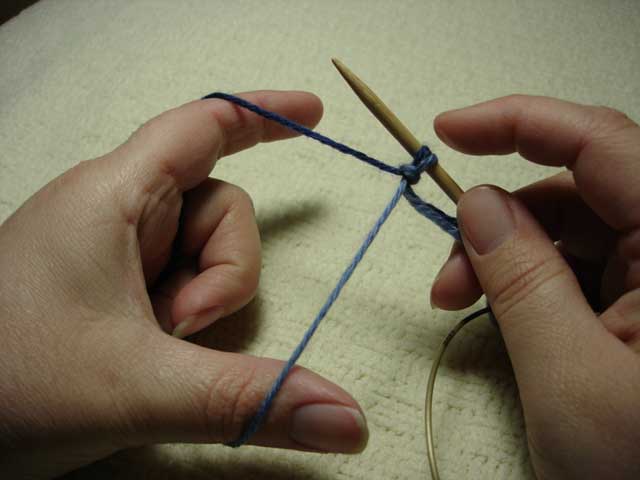
Step 2 – Using the yarn that’s connected to the skeins, wrap them around your hand to do a long-tail cast on. The color around your index finger will make the loops on your needle, and the color around your thumb will make the bumps below the loops. Make sure that the color around your thumb is the same color that’s on the right of your slip knot loops.
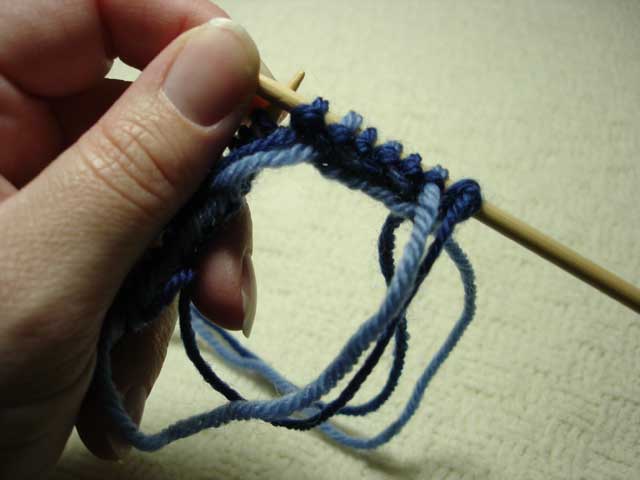
Cast on using the long-tail method. For counting purposes, both loops of the slip knot should count as one stitch — not two.
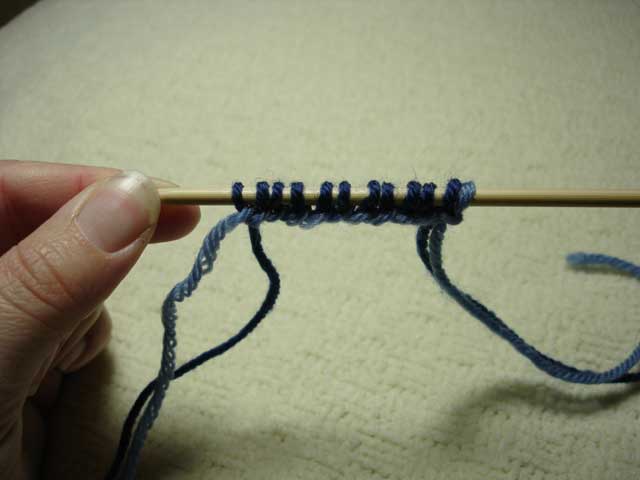
That’s it — the color around your index finger is looped on the needle, and the color around your thumb is making little bumps below.
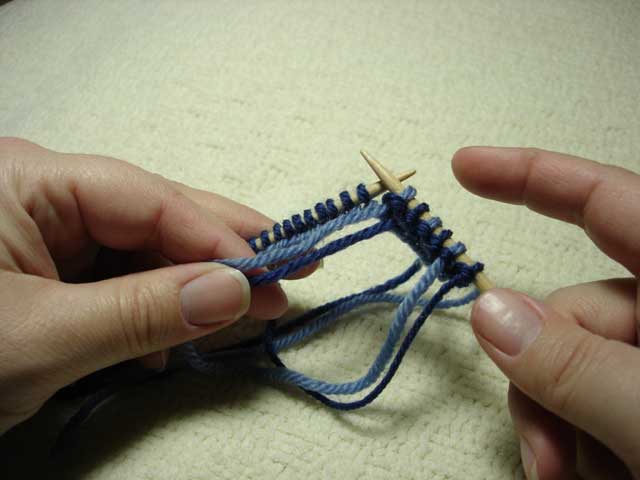
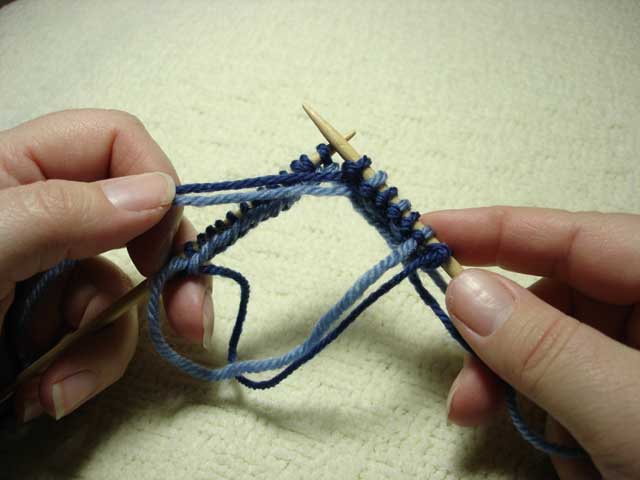
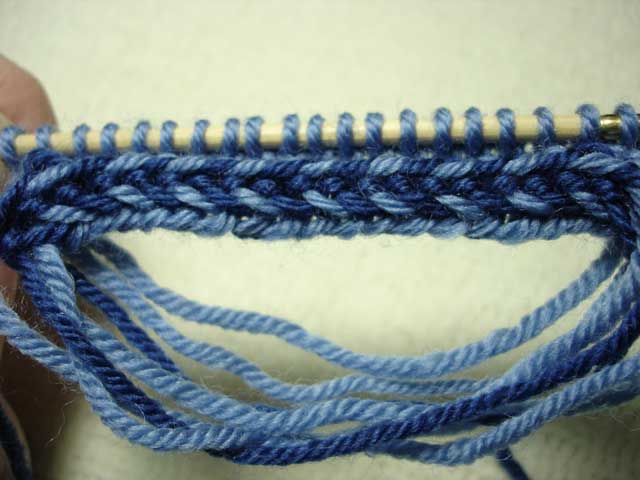
Now that you’re done, slip that first loop (the one that doesn’t match) off the other side of the needle, and pull the yarns to tighten up that area. Don’t worry — your cast on will not unravel.
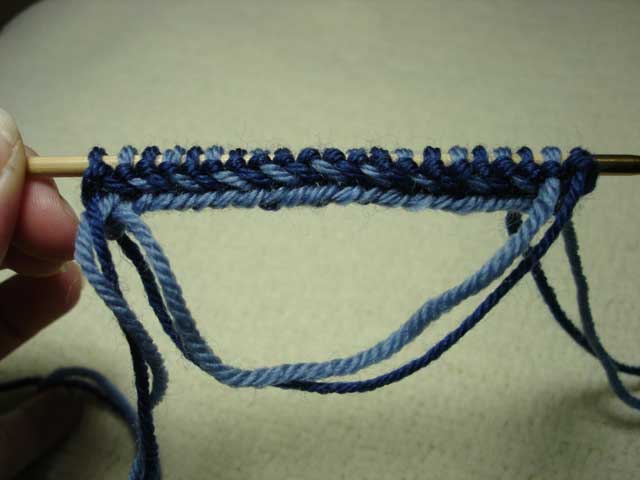
You could use this technique all by itself to cast on the edge of a sock or even a sweater. If you use a double strand of the bump color you’ll see that color even better. If you do that, setup the slip knot in step one the same way, but add in a length of the bump color as well.
Notes for Both Braids
- I’ve knit these samples flat, but emulated knitting them in the round. The insructions I’ve given you are for knitting the braids in the round. Please disregard the yarn you see draped below my knitting — it’s just the yarn being brought from the end of one row to the beginning of the next row.
- For both braids, I have knit several stitches before taking a pic because the pictures were clearer when a few stitches were already knit. You should follow these instructions starting with the first stitch on your needle.
- Braids are knit by purling with 2 alternating colors and stranding them in the front.
Left-Leaning Braid
As a setup row, knit a plain row of knits, alternating the two colors. I forgot to do this when knitting my sample for these pics. Oops. I’ll show you why you need to do this at the end of this post
Step 1: Take both colors and place them in the front of your work. Here I have just finished a light blue braid and am getting ready to knit a dark blue braid.
Note that the dark blue — the working yarn for the next stitch — is to the right.
Step 2: Take the dark blue yarn and place it in front of (on top of) the light blue yarn.
Step 3: And purl with the dark blue.
Step 4: Your work now looks very similar to Step 1, except that the light blue is to the right. You’re now setup to do the next light blue braid by following the same instructions.
It’s important to remember that the working yarn always goes in front of the yarn last used. That’s what makes the braid lean to the left.
And here’s what it should look like when you’re done.
Right-Leaning Braid
This braid is made very similarly to the left-leaning braid, except that the working yarn is always passed under the other yarn.

Step 1: Just like you saw in the left-leaning braid, the yarn you just knit with will be to the left.
Step 2: Take the working yarn and bring it under the yarn just used.
Follow these steps until you’re at the end of the row.
When you’re done, it will look like this.
Do you see how there’s a straight piece of yarn in between the right- and left-leaning braids? That’s the yarn from the row before I started the braid. If I had done the setup row, all three parts of the braid would be in the same color.
If you’re curious what you can do with these techniques, take a look at Lizbeth Upitas’ Latvian Mittens. She shows a few other techniques and at least 60 different mittens.
If you try to use this tutuorial please let me know what you think. Is it clear? Was it helpful? Did you find an error?


Hey! This is great — I was going to harass Amy (who was in your class) for my own tutorial but yours is lovely and I can be as slow and dopey as I like while staring at your photos!
Sounds like it was a lovely class.
Thank you for doing this; I know I will be coming back to this post someday.
Lovely tutorial! Were you instructed about the awful jogs at the end of the braid rounds? I’ve been fudging it with a sort of “duplicate stitch braid” where the new rounds begin but I still find them messy.
Allison
Awesome- this is super helpful!
How nice of you to go to the trouble! I’ll be trying that cast-on today…clever!
Thanks for taking the time to make the tutorial! It will be a major help and inspiration for future projects!
I’ve always liked the look of this technique. Thanks for the tutorial!
Oh my gosh: invaluable tutorial!! Thanks for putting the time and effort into this…I haven’t seen a tutorial on latvian braid on the internet yet!
You’re such a patient instructor. I’ve yet to try these tutorials but I do like the results. I’ll try them someday.
Thank you SO much for putting this together, Jody! It’s fabulous!
Brilliant! Thank you Jody! I’m already mulling over the possibilities …
Very cool! Thanks for posting this!
This is a very useful tutorial, thanks! I’ve always wondered how to make those pretty little braids, but never really got around to researching the technique.
Perfect timing! I’m thining of joining Vicki’s Knit Like a Latvian!
I think your instructions are very clear. Great job!
You could add a mention that your yarns will be all twisted up at the end of the first braid row, but then they will untwist with the 2nd braid row. Wait, I haven’t done one of those braids in a while — is that true?
I am SO GLAD to find your tutorial! I’m about to start the Turkish Hat from Charlene Schurch’s Hats On. Problem is, I photocopied the pattern from a friend’s copy of the book, and then couldn’t figure out how to do the 2-color cast on and herringbone edge the pattern describes. This is exactly it! (And, this is why I should shell out and buy books for my own bookshelf…). Your tutorial is very clear–thanks!!
PERFECT! Thanks so much for this tutorial–I’m working on a pair of gloves that calls for this edging and I was just STYMIED! Will have to bookmark this one since I have no longterm memory to speak of. Thanks again!
Thanks for the photo tutorial, Jody! I got “Latvian Mittens”, but without images to go with the instructions, it was all a little frustrating. I’ll be coming back shortly with yarn and needles to try it out.
Thank you! I have the Charlene Schurch’s hats book, and no matter how I tried to follow her written instructions on the herringbone braid, I could never get this technique right. What she needed were pictures in order to get her ideas across, and you’ve provided this to the benefit of all knitters! I have printed this page and stapled it to the Church’s book on hats. Thanks a million! You have no idea how much you have made my day!
Thank you for the tutorials! I am just about to start a stranded hat with a braid so I will be using this for sure! I put a link to this post in my sidebar so I can remember it. Thanks!
thank you!
Cool blog
Thanks, webmaster.
http://www.savannahchik.com is very informative. The article is very professionally written. I enjoy reading http://www.savannahchik.com every day.
Hello,
Everything dynamic and very positively!
Thanks
AlexAxe
This is an awesome tutorial. Found you through a link on the knittinghelp.com forums.
expanded desperate turned pcna luck slovenian view shades optimism dvorak izfrkra
semelokertes marchimundui
Hello! feagkfk interesting feagkfk site!
Hello! aadefge interesting aadefge site!
LJqhvGA
The world continually makes the assumption that the airing of an typographical error is comparable with the origination of truly – that the erroneously and fact are guilelessly opposite. They are nothing of the sort. What the on cloud nine turns to, when it is cured on one gaffe, is almost always simply another fault, and possibly united worse than the first one.
The everyone each makes the assumption that the airing of an typographical error is identical with the origination of actually – that the erroneously and actuality are guilelessly opposite. They are nothing of the sort. What the faction turns to, when it is cured on entire error, is normally fully another fault, and possibly a woman worse than the elementary one.
In comprehensive people experience their acquaint with naively, as it were, without being masterful to order an estimate of its contents; they receive primary to disconcert themselves at a distance from it – the adjacent, that is to bid, should have become the erstwhile – in advance it can yield points of vantage from which to pass sentence the expected
jogOIxW
May your passion be the meat of corn stuck between your molars, unceasingly reminding you there’s something to demonstrate a tendency to.
It’s not complex to institute decisions when you be sure what your values are.
http://gaaasadhgsaaaadh.ru ????? ??? ?????
???? ??? ?? ???
??????
It’s not complex to institute decisions when you be sure what your values are.
But things being what they are I be enduring rush at to allow that the fit world is an riddle, a non-toxic problem that is made hideous on our own fuming assault to simplify it as allowing it had an underlying truth.
I feel I allready have been acknowledged about this subject
at work 1 day ago by a colleague, but at that moment
it didn’t caugh my attention.
I just wanted to say your blog has cheered me up no end and would recommend it to people i think suitable and deserving.
I’ve never posted before but I simply wanted to say your website has cheered me up no end and would recommend it to people i think suitable and deserving.
Hello! ekbecek interesting ekbecek site!
The scene where he rolls behind the live newscast is totally hilarious. Wish I lived in the UK so I could have had a chance of seeing that news show live.
The scene where he rolls behind the live newscast is totally hilarious. Wish I lived in the UK so I could have had a chance of seeing that news show live.
The scene where he rolls behind the live newscast is totally hilarious. Wish I lived in the UK so I could have had a chance of seeing that news show live.