
Kathleen and Vicki hit the nail on the head. It was the old guard article with the pic of Alice wearing her very own St Brigid that did me in. The moment I turned the page and saw that it was all over. I even picked a shade similar to hers.
I find it interesting that my St Brigid KAL buddies were the only ones to note that Alice was wearing St Brigid in the pic. Once that sweater is in your blood it’s there for good. I’ve considered knitting it several times a year and have cast on for it no less than 4 times — you can see 2 shades of green here in December 05, natural in December 04, and dark gray in August 04. I also remember a purple/black shade of Cascade 220 called Rainier Heather, but it doesn’t look like I blogged about it.
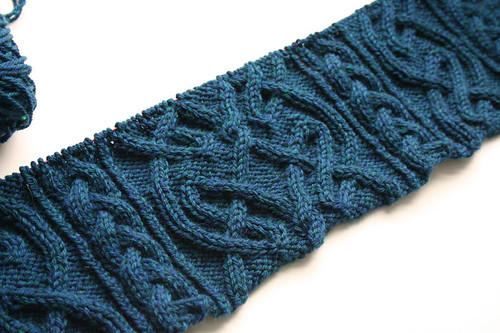
So in this case 6th time is a charm because I am 100% sold on this color.
stop laughing Christy i’m serious here
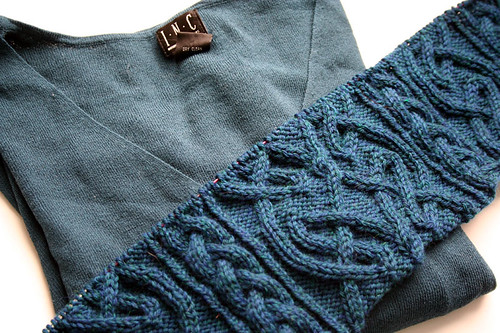
It’s no surprise either, given that it very closely matches one of my all-time favorite sweaters.
So are you curious who won?
Six of you guessed St Brigid out of 45 votes, and….
Kathleen won!
Congratulations Kathleen! It seems fitting that you won since you’re a big part of the reason I started and have continued to be obsessed with this sweater for so long.
What did Kathleen win? Well, I’m not sure yet. We’re in talks now

St Brigid in 10 weeks?
Yeah, it’ll be tight. And, just like you’d expect, I have a few mods planned.
Firstly, I’m going to adjust the sleeves. I’m not sure yet if I’m going to do a modified drop sleeve or a set-in sleeve. I hadn’t considered a set-in sleeve for an aran, but the Phildar Hoodie has set-in sleeves and it looks pretty good.
I’m also planning to adjust the neckline. While I love the look, a round neck is not a good shape for me. I’m considering a hood but I need to give some more thought to how the transition from front cables to hood can work.
Here’s my rough schedule in order to stay finish on time:
- back: 2 weeks through Aug 26th
- front: 2 weeks through Sept 9th
- sleeve 1: 1.5 weeks through Sept 19th
- sleeve 2: 1.5 weeks through Sept 30th
- hood: 1 week through Oct 7th
- finishing: 1 week through Oct 14th
That takes up every weekend from now through Rhinebeck. I probably don’t need 2 weeks total for the hood and finishing, but a little slack in a schedule is always a good thing.
For you, my dear readers, this may not be very exciting. This leaves very little room for me to knit anything other than St Brigid. This also means that my festival stash won’t get any smaller.
But, if I can walk around Rhinebeck wearing St Brigid, I’ll be just fine with that.
just in case you’re thinking of warning me about indian summer and how Rhinebeck was really warm 2 years ago — i don’t care. it’s not that i’m denying that it can happen, but Rhinebeck is all about celebrating fall knitting to me. if it’s too warm to wear a sweater like St Brigid then i’ll walk around in a tshirt, with my st brigid tied around my waist i’m sure 😉


I’m knitting that sweater right now. Very intense. I made the back and then took a month off. Same with the front. I’m thinking it’s about an 80 hour sweater. I’ll be excited to see how your’s turns out…and if you manage to make it on the schedule you have set out for yourself. Happy knitting!
That is absolutely gorgeous. Thanks for all your tutorials, that’s how I found your site.
ooo! i’m glad it’s St. Brigid!!!! that color is fab and you’ve made good progress, so far.
if Christy wears Rogue, we three will be a cabled trio strolling the fest.
That’s a gorgeous pattern. Excellent choice!
It looks like you’re off to a good start!
There’s no doubt that it will be amazing. I can’t wait to follow your progress.
I absolutely LOVE the Aporto color. I used it in that felted bag I made last autumn and am right now making a Ribby for myself. I keep spreading it out on my lap an murmuring, “That is just the prettiest blue,” over and over.
Your cables are looking fanatastic. What’s not to love about a good sweater with great cables in a fantastic color?
Ah, yes, wonderful choice. That is an amazing color; I can imagine it looking great on you. And the cables are popping right out of the fabric. This will be a classic, keep-forever sweater.
I knew it! YAY!! This will be fun for me. ; ) Beautiful color — absolutely eye-popping with the texture work. Oh, it’s going to be GORGEOUS!
I wore St. Brigid in the warm at Rhinebeck two years ago — for as long as I could stand it, anyway!
I can’t wait to see how it all works out! Are you going to eliminate the sleeve/shoulder saddle?
I am intrigued. It is, after all, the most beautiful sweater in the whole wide world. So I am thrilled you are walking off the sleeve change cliff ahead of me. I shall take notes on your journey.
I couldn’t make up my mind between this and Celtic Dreams. But something about Rhinebeck says big ole aran….
giggle…giggle
I am so excited to see you ready to knit this. The color is beautiful and will look really great on you. To Heather’s comment above, I’m planning to knit my own aran for the festival (better get started on that).
As for interesting blogging, I think it will be. Keep those progress pictures and notes on modifications coming!
Nice choice!!!!! it will be beautiful!!!!!
oh, lovely choice for a sweater. and the cables are luscious in that color!
love it, love that color!
I love that you’re knitting St. Brigid and it sounds like you’ve got a great plan.
I’ve thought about “her” for years…just can’t get the pattern. Sigh.
Can’t wait to see you at Rhinebeck.
Ack! I almost guessed that, but the weather thing put me off! I’m knitting a sweater for SAFF and decided to make it a cardi because I want to be able to wear it at least part of the time! Looks great – what yarn are you using?
Ooh, wow. It looks awesome in that color!
Awesome choice! Although I didn’t guess St Brigit – I did go so far as to look for the pattern only to realize the book is out of print and very expensive! I did manage to find another Alice Starmore book at my local library – Fisherman’s sweaters. There are many amazing cabled sweaters in there too. I may have to try one for myself!
I thought it would be the Phildar sweater, but this is even better! And what a challenge! I love how the cables just pop.
As for converting it into a hoodie (and note that I’ve never done it before, so I’m only guessing, and I’m looking at Vicki’s on Flickr right now), perhaps you could continue the two braids left and right of the center panel into the hood, and continue the back pattern. And then do the folded ribbing around the edge?
I hope I don’t sound too much like an armchair jockey!
Go! 10 weeks? You can totally do it!
And one doesn’t need multiple projects to be interesting! We’re with you all the way!
I am always a sucker for blue. And what a sweater! I cannot wait to see your progress! I’ll check in often!
It is a beautiful pattern, but what I admire most is your *SCHEDULE*. Gosh, I wish I were that organized and reliable knitwise!
Considering this will be the beginning of my 3rd year on St. Brigid–I would love to be done for Rhinebeck too. Or Paris.
Ooh. It’s lovely. Nice choice.
It’s gorgeous so far! I was thinking a sweater for Rhinebeck too, but then I nixed the idea. But you are right, I am going to follow your lead on this. I am going to start a sweater.
I love the color you chose. It’s going to be beautiful!
Yum! I’m working myself up for Brigid! So *what* yarn is this you’ve chosen?
I’ll be cheering for you and your deadline!
Once that sweater is in your blood it’s there for good.
Oh, so true! When I discovered just last week that a library the next county up had a copy of “Aran Knitting” available, I almost cried. 😛 I didn’t think I’d ever be able to get my hands on the St. Brigid pattern.
Yours is looking lovely so far!
Good morning. We are what we repeatedly do.
I am from Croatia and also now teach English, please tell me right I wrote the following sentence: “Greggs segregated air of a judge term alongside mcnulty, army gant chart.”
Waiting for a reply :-D, Alban.